|
Please follow these steps so you have the best settings for horn lessons.
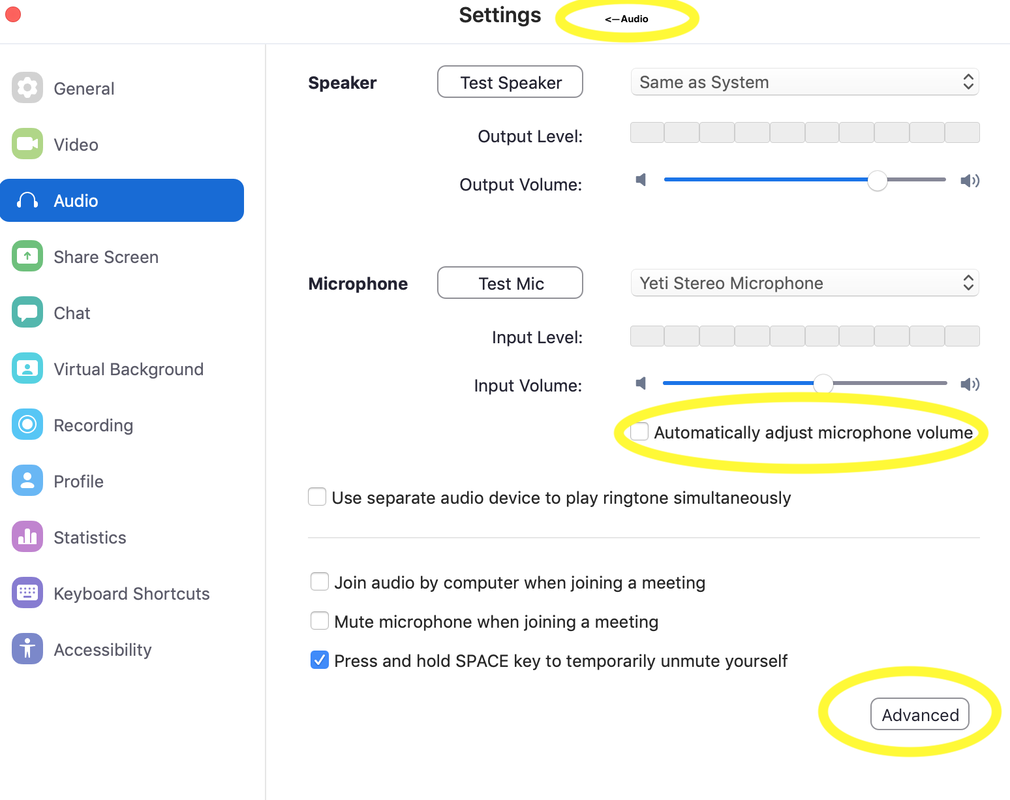
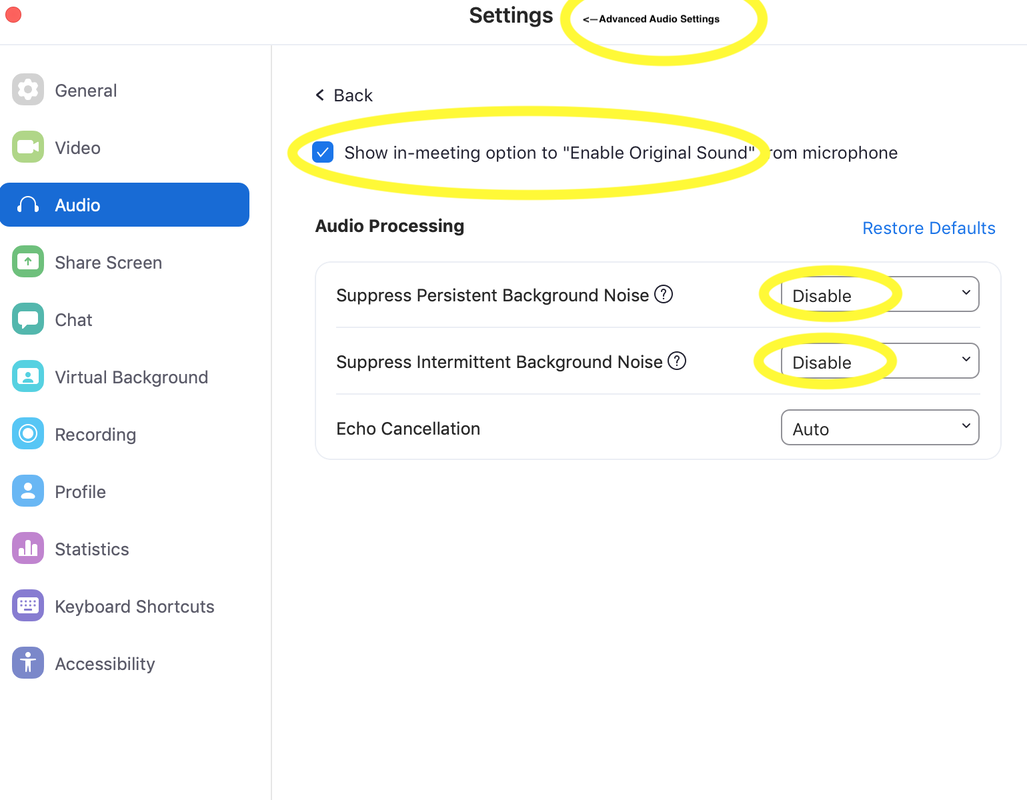
1. Open Audio Settings A. If you are starting from the Zoom home screen, click on the Tools symbol at the top right. A new screen will appear with several options. Click on Audio. B. If you are adjusting audio settings when you are on a call already: 1. Click on the ^ symbol between your Mute and Stop Video buttons, on the bottom left of your Zoom screen. This upward arrow will open a menu of options. Click on Audio Settings. 3. You will see Speaker and Microphone options. You may want to adjust the input volume or output volume. For most of my students, about 70-80% volume works well for both. For those of you who have external mics: Under Microphone, check that your external mic is being used by your computer by clicking on the drop-down menu and making sure your external mic is selected. 4. Under Microphone: uncheck the option box that says "Automatically adjust microphone volume." You do not want the Zoom software to change your volume as you play. 5. Click on Advanced Settings, which is a tab at the bottom right of the Audio Settings screen. 6. In Advanced Settings, check the box at the top that says "Show in-meeting options to 'Enable Original Sound' from microphone." Once you check this box, your system will keep your original sound and not try to "fix" it. 7. On the same Advanced Settings screen, under Audio Processing, click the following: Disable, Disable, and Auto. You want to disable both "suppress background noise," which will otherwise lead to intermittent cutting in and out of your audio as the system tries to guess which sounds it hears are "noise." These steps will not take long to set up, but will provide a much better continuous audio experience for lessons! -Erika NB: Although an external mic is not required, it does make a huge difference in how well your sound is picked up and transmitted via Zoom. I strongly encourage students to consider investing in a USB external mic. They provide a truer image of your sound compared to your internal microphone on your computer, which is designed for talking voices and in addition is probably is a bit too far away from you and your sound. Here is a short video that also goes through the options if you'd rather follow a video: https://www.youtube.com/watch?v=MynQPhULNRU Below is a screen shot highlighting the Audio and Advanced Audio Settings you can change:
0 Comments
Currently, as of summer 2018, my preferred platform for teaching online lessons is FaceTime. Skype and Google Hangouts also work well, but FaceTime seems to be most reliable, with the fewest connectivity, audio, or visual issues. Most importantly, the audio is consistent and in my experience FaceTime has less delay between the two sides of the call. It's probably only a few hundredths of a second different, but I notice the difference.
Skype's biggest issue is that it will sometimes "mute" one side of the call, when it incorrectly perceives that there is too much background noise. This happens usually when a student is playing a long note. However, here is a way to fix that issue. Technical Issue: How can I stop Skype audio from cutting out momentarily? Answer: This problem is usually caused by Skype overcompensating for what it believes to be loud background noise levels. Go into Skype’s Tools menu, then to Options… and select the Audio Settings tab. First, check that the HUE camera is selected as the microphone, and then uncheck the box below marked, “Let Skype adjust my audio settings”. Initially it is best to set the volume slider a little less than halfway along the bar. You can adjust this later to suit your preferences. Remember to save your settings before closing the window. The sound levels should now remain steady when you’re making calls. This information was taken from the following resource: https://huehd.com/ufaqs/microphone-cuts-making-skype-calls/ |
Erika WilsenHorn teacher and performer Categories
All
Archives
October 2022
|


 RSS Feed